Saturday, July 28, 2012

Post #22 A partnership...with the dead

Once upon a time, Westchester County's land was cleared and trees were the exception, not the rule.  Trees were sparsely sprinkled across the landscape and grew reliably in only a few locations: shading the farm house, lining the prominent road, marking the property's corner, bordering the swamp.
A painting of 1830's New England.  
If trees were the exception, farms were the rule.  Specifically, sheep farms.  Oh yes – most of the old rock walls you drive past were erected to keep in place big, silly looking Merino sheep.  During the late 1700's and early 1800's wool was one of New England's biggest inland industries. With the opening of the American West by mid-century, the cold rocky soils of New England were abandoned for the cold prairie soils west of the Mississippi.  Some eastern farmland was simply abandoned...and thus began the trend of reforesting New England. Starting then, trees became more of the rule and less of the exception.               
A Merino sheep in need of a hair cut.  
As an abandoned farm grows into a forest we can expect to see a certain pattern in the plants.  At first, fields of flowers and shrubs dominate.  Soon after, fast growing and short lived, 'weedy' trees – like birch, black locust, and eastern red cedar – take over.  Eventually, slower growing and longer lived trees – like the white oak – assume their position on the old farmland.  Across New England,  when farms were left to revert back to forests, the eastern red cedar became a very common tree.

An old field naturally dominated by eastern red cedar trees.  As forests in southern New England regrow from cleared land, they often pass through this stage, which remains evident even after the trees die.   
At the Armstrong House Education Center you can still see this early stage of reforestation.  Here, like in many other forested parts of southern New England, you will see hundreds of eastern red cedar trees standing dead or dying in the shadows of larger trees.  These trees thrived in open, full-light conditions but were slowly killed by the surrounding forest as they were shaded out.  Their naturally rot and insect-resistant wood allows them to persist in the forest as dead trees for over a decade.  Currently, living cedars are not very common; most of the cedars you will run across in Northern Westchester County take the form of fence post, gates, benches or hand rails.

The Pound Ridge Land Conservancy has entered into a partnership with this tree.  The cedar is rot resistant and strong, making it ideal as a long lasting, outdoor building material.  Here at the Armstrong House Education Center we use eastern red cedar posts to hold up our garden fence, prop up our mailbox, keep up the shed wall, strengthen the chicken coop and support the hanging branch of an old gray dogwood tree.  To say the least, we think very highly of its usefulness.

Strong cedar posts hold up our garden fence.

Four cedar posts act as the central support system to our chicken coop, seen here in progress.

A cedar helping to hold up our outdoor work shed

A slender cedar post holding up a very old dogwood branch

So what about this resource in the future?  Will our forests provide us with eastern red cedar to build with in twenty years?  Not unless we plant some new ones today.  And that is exactly what we are doing on the Armstrong Preserve.

Why isn't eastern red cedar growing in the forests of Northern Westchester County today?

Two reasons:
1) These trees require abundant light to get started, which the forest floor does not provide.  Much of Northern Westchester County is forested and the few places that are not forested are typically mowed.

2)  White tailed deer destroy the trees that have managed to find an appropriately sunny location.  In this respect, the eastern red cedar is like all the other trees in the area – the deer are keeping them from growing.  Without a change, our forests will look a lot different in the future.   

To ensure that there will be red cedar for the future we grow it in the following sunny places:
1)  Our tree nursery, a well-lit fenced area attached to our garden.
2) The Armstrong Preserve's cliff face.  This bedrock cliff is bathed in sunlight and is out of reach from deer.
3) And coming soon, eastern red cedar will grow in our meadow.  As part of the Armstrong Meadow Management Plan, we will be establishing a zone of small trees and shrubs around the meadow's perimeter, which is currently occupied by Japanese Barberry.    

Eastern red cedar growing on a rock cliff at the Armstrong Preserve
How does using eastern red cedar as a building material help us Live Lighter on the Land?
By using wood that is produced in our forests we don't have to import wood from overseas.  This means we use less fuel for shipping.  Also, by being intimately involved in the production and harvest of the wood, we can better understand and appreciate the impact of our actions.  In other words, we can clearly see the ecological impact that our building projects have on our landscape.      

Can you form a partnership with the eastern red cedar?
You sure can.  Just pick a sunny spot on your property and plant a few eastern red cedars.  While they are growing you can actively harvest some dead cedars from your property and you won't be exhausting your supply.  The goal is to always have some new trees growing for future building projects. 
Remember, you need to keep them safe from deer until they are big enough to protect themselves.  You can simply fence them in, or spray them with a deer repellent.  You can buy very cheap saplings from the state here.    

*The introductory paragraph to this post is a generalization of New England's landscape history.  For more information on this interesting topic see here and here.  

Thursday, July 19, 2012

Post#21 Partnerships with a BUZZ

Hey, do you like sweets?  Of course you do, who doesn’t?  Have you ever thought about the sugars inside your yogurt, muffin or Snickers bar?  Do you know where sugar comes from? Here in the United States, sugar commonly comes from either sugar cane or corn syrup.  Less common sources of sugar include beets, maple syrup, concentrated fruit juice and honey.  The last one – honey – is the topic of this week’s blog.  Here at the Armstrong House Education Center we have entered into a partnership with a colony of honeybees; we keep them alive and well fed and in return they produce for us honey and wax.  It’s simply beautiful.

Members of my honeybee school checking on a hive in May.
How do honeybees produce honey?
Honey production is a multi-step process, which the honeybees carry out naturally.  First, certain ‘forager’ bees leave the colony to find flowers.  At a flower, they extract nectar (essentially sugar water) and bring it back to the hive.  There, they store the nectar in their comb and process it into honey.  They do this by adding enzymes to the nectar and evaporating the water out of it.  Initially, nectar is roughly 80% water.  In the end, honey is roughly 18% water – the rest was removed by evaporation.   Once the honey reaches the right concentration, the bees ‘cap’ the part of the comb that it is in.  Capped honeycomb means finished honey!

Capped (left) and uncapped (right) honey comb.  The bees cap the honey when it reaches the right sugar concentration.  It is from this capped form that we harvest the honey.  


Honey harvest at honeybee school.  The class used a hot blade to cut open the tops of the comb.  From here, the comb was centrifuged and the honey was released.  

Why would bees go to so much trouble just to make honey?
To the honeybee, honey represents food for the winter.  It’s a simple cycle – honeybees make honey during the growing season, store it in their comb and eat it during the winter.  Without this winter food the bees would starve to death. 

Does extracting honey necessarily mean the death of the colony?
Nope.  The point of beekeeping is to keep the bees alive (hence, beekeeping).  If your bees die, you are out bees, honey and your investment.  Therefore, it is important to leave enough honey in the hive to support your bees all winter long.  If done carefully and correctly, beekeeping can result in honey for our consumption and the long-term health of the colony.  It's a win-win situation. 

Isn’t it a whole lot easier to just go to the store and buy honey?
It is certainly easier, but it is a lot less fun and rewarding.  Keeping your own colony of bees connects you with nature and provides deep insight into another creature’s life.  Plus, much of the honey for sale at your supermarket is tied to industrial agricultural.  How?  Large-scale honey producers truck their bees around the country to collect nectar from large monocultures of crops such as almonds, cranberries and blueberries.  Local honey is usually made from nectar from small, diversified farms, and the bees are able to provide pollination to the area's wild plants throughout the growing season as well.  Lastly, making honey at home or buying it locally reduces the need to truck honey in from distant corners of the world.  Much of the world’s honey is made in China and Argentina; shipping it from across the planet is obviously unnecessary.     


A blooming almond grove in California.  Most of the world's almonds come from this type of monoculture farming.  Hundreds of thousands of honeybees are trucked in to pollinate the trees.   

Honeybees and your vegetable garden
In the process of extracting nectar from flowers, honeybees carry pollen from one plant to the next.  This pollination is crucial to the plant, for without it, the plant can't produce its fruit.  The best way to ensure that your garden is fully pollinated (aka, fully productive) is to recruit the help of a workaholic pollinator like the honeybee.  With their help, every flower the garden produces has the best chance of being pollinated and turning into a future piece of food – maybe a tomato or a snap pea.  

How do I get my own honeybees?
There are many options for buying honeybees and beekeeping equipment: websites, paper catalogues, local beekeeping services, etc.  The honeybees at the Armstrong House Education Center were purchased from Bedford Bee Honey Bee Service of Bedford, NY.  Its proprietor, DJ Haverkamp, has been keeping bees for over twenty years and is currently teaching beekeeping classes at John Jay Homestead in Bedford, NY and Teatown Reservation, Ossining, NY. 


Bedford Bee Honeybee Service is a company based in Bedford, NY that provides great honeybee services, including an April-October honeybee school, queens for sale and private hive maintenance. 

I want to keep bees in my backyard, but I don’t want to spend the time taking care of them.  Can I still keep bees? 
Yes, companies like the Bedford Honey Bee Service provide a honeybee care service.  Much like a pool service, Bedford Honeybee service will ‘open’ the hive in the spring, provide any maintenance or care throughout the season and ‘close’ the hive in late autumn.  

What does keeping bees have to do with Living Lighter on the Land?
The best backyard food producers are dedicated land stewards; they work to retain their property's natural resources such as rich soil and clean, abundant water and biodiversity.  Remember, in these types of partnerships with nature, the energy you put in is rewarded.  

Also backyard food production is an ecologically responsible alternative to the large scale, industrial farming that has become common in the United States.  For an awesome primer on agricultural trends of the last 50 years, see this.  Lastly, producing food in your backyard – be it honey from bees, eggplant, basil or goat milk – cuts out the fossil fuels used in its transportation.


Friday, July 13, 2012

Post #20 Partnerships

It seems like our world is shrinking.  Everywhere is accessible – the Internet picks up where the interstate highway system leaves off.  We have lightning-fast, global communications – with a satellite phone you can check your stock quotes from the arctic tundra.  Exotic fruit is available all year round – you can buy a star fruit in Shoprite on the winter solstice.  Of course, the planet is the same size it has always been, but it is starting to feel less enormous.  Among all of this planet shrinking, two things remain: 1) human kind, and 2) the rest of nature.  It is no longer an option to separate the two; to coexist we must forge long-lasting partnerships.

Here at the Armstrong House Educational Center, I am doing just that.  I am practicing the old saying of 'you scratch my back and I'll scratch yours' with nature.  I have entered into a partnership with some interesting critters and they have (in a way) agreed to take out my garbage.  No, I haven't trained a troop of chimpanzees to clean my house; I am talking about red wiggler worms.  In something called vermiculture or vermicomposting, I use worms to turn my food scraps into compost.  In fact, they eat more than just household food scraps – these little suckers can take down my coffee grounds, the New York Times, shredded pizza boxes, plant trimmings, kleenex, egg cartons, orange peels and old bread.  It is through this partnership, and others like it, that we can reduce our use of resources and Live Lighter on the Land.

Did Tate say 'worms'?
Yes, worms.  For those of us who don't have outdoor space for compost, using worms is a great indoor alternative.  Did Tate say 'indoors'? Yes, indoor composting.  If managed properly (and believe me, it is easy) these worms don't produce any foul smells or attract flies.  Vermicomposting is very simple – all you need is a worm bin (see below), some organic waste and some red wriggler worms.  The worms eat the organic material and poop out 'castings', which can be directly used as compost.  Simple.  

A red wiggler worm working its way through a pile of organic debris.  They consume food scraps and leave behind castings – a very nutritious growing medium for plants.   
Why not just throw our organic debris in the garbage?
If we think of our organic debris as valuable material and not just 'waste', it doesn't make a whole lot of sense to throw it in the garbage.  Once we throw it out, it is wasted – buried in a landfill or burned in an incinerator.  This organic debris is filled with energy, nutrients and minerals that can be recycled and used again in our gardens.  Also, by recycling our used organic material we don't have to spend money and fossil fuels to transport it.  Check out what the United States Environmental Protection Agency says about food waste.  According to them, in 2010, food waste accounted for almost 14% of the municipal solid waste stream!  Now that's putting the waste in 'food waste'.          

Where does Tate keep his red wrigglers?
My worms live happily in the corner of my kitchen in a simple plastic container called a 'Wormcycler'.  The Wormcycler is a closed container comprised of a stack of square, mesh bottomed trays. The mechanics are simple – worms and organic debris are placed in the lowest tray.  The worms slowly eat the organic debris and once their food supply is exhausted, they naturally migrate upwards to a fresh tray.
My plastic 'Wormcycler' bin.  This product was generously donated to the Pound Ridge Land Conservancy by worm composting company Nature's Footprint.  You can see that the Wormcycler sits neatly in the corner of my kitchen.             

Where did Tate get his Wormcycler, and can I get one?
My Wormcycler was generously donated by Nature's Footprint, a company specializing in vermiculture and home gardening equipment.  You can get your very own Wormcycler at a discounted price through Nature's Footprint's Create Compost Direct Delivery Program.  Ordering is easy, just see the instructions on the poster below.


A promotional poster.  You can buy a 'Wormcycler' at a discounted price if you use the PRLC's special code.  See instructions on the poster.  

Where can I get my own red wiggler worms?
There are many places you can buy red wiggler worms online.  You can even get them from Nature's Footprint when you get your Wormcycler.  Another fun website is Uncle Jim's Worm Farm.  

How do I care for my worms?
It's actually pretty easy to keep red wigglers alive.  The worms like a slightly moist environment (not dripping wet, but moist to the touch).  It is easy to regulate the level of moisture by adding more wet or dry material.  These are indoor critters – they like an environment between 50-80 degrees F.  If you need specific care information, check the Internet; a quick on-line search will yield dozens of vermiculture websites.  To make it even simpler, the Wormcycler comes with its very own easy-to-understand instruction manual that outlines the Do's and Don'ts of worm husbandry.

Won't the Wormcycler attract flies and turn stinky?
Your Wormcycler will be fly and odor-free if you follow these two key rules:
  1. Only feed the worms what they are going to eat.  Over feeding attracts unwanted critters
  2. Make sure you have the right level of moisture – not too dry, not too wet.
Really, if your worm bin is acting up, its because you haven't paid any attention to it.  I check my worm bin roughly once every three days and spend roughly 10 minutes making sure everything is fine and dandy.  

What does the inside of a Wormcycler look like?
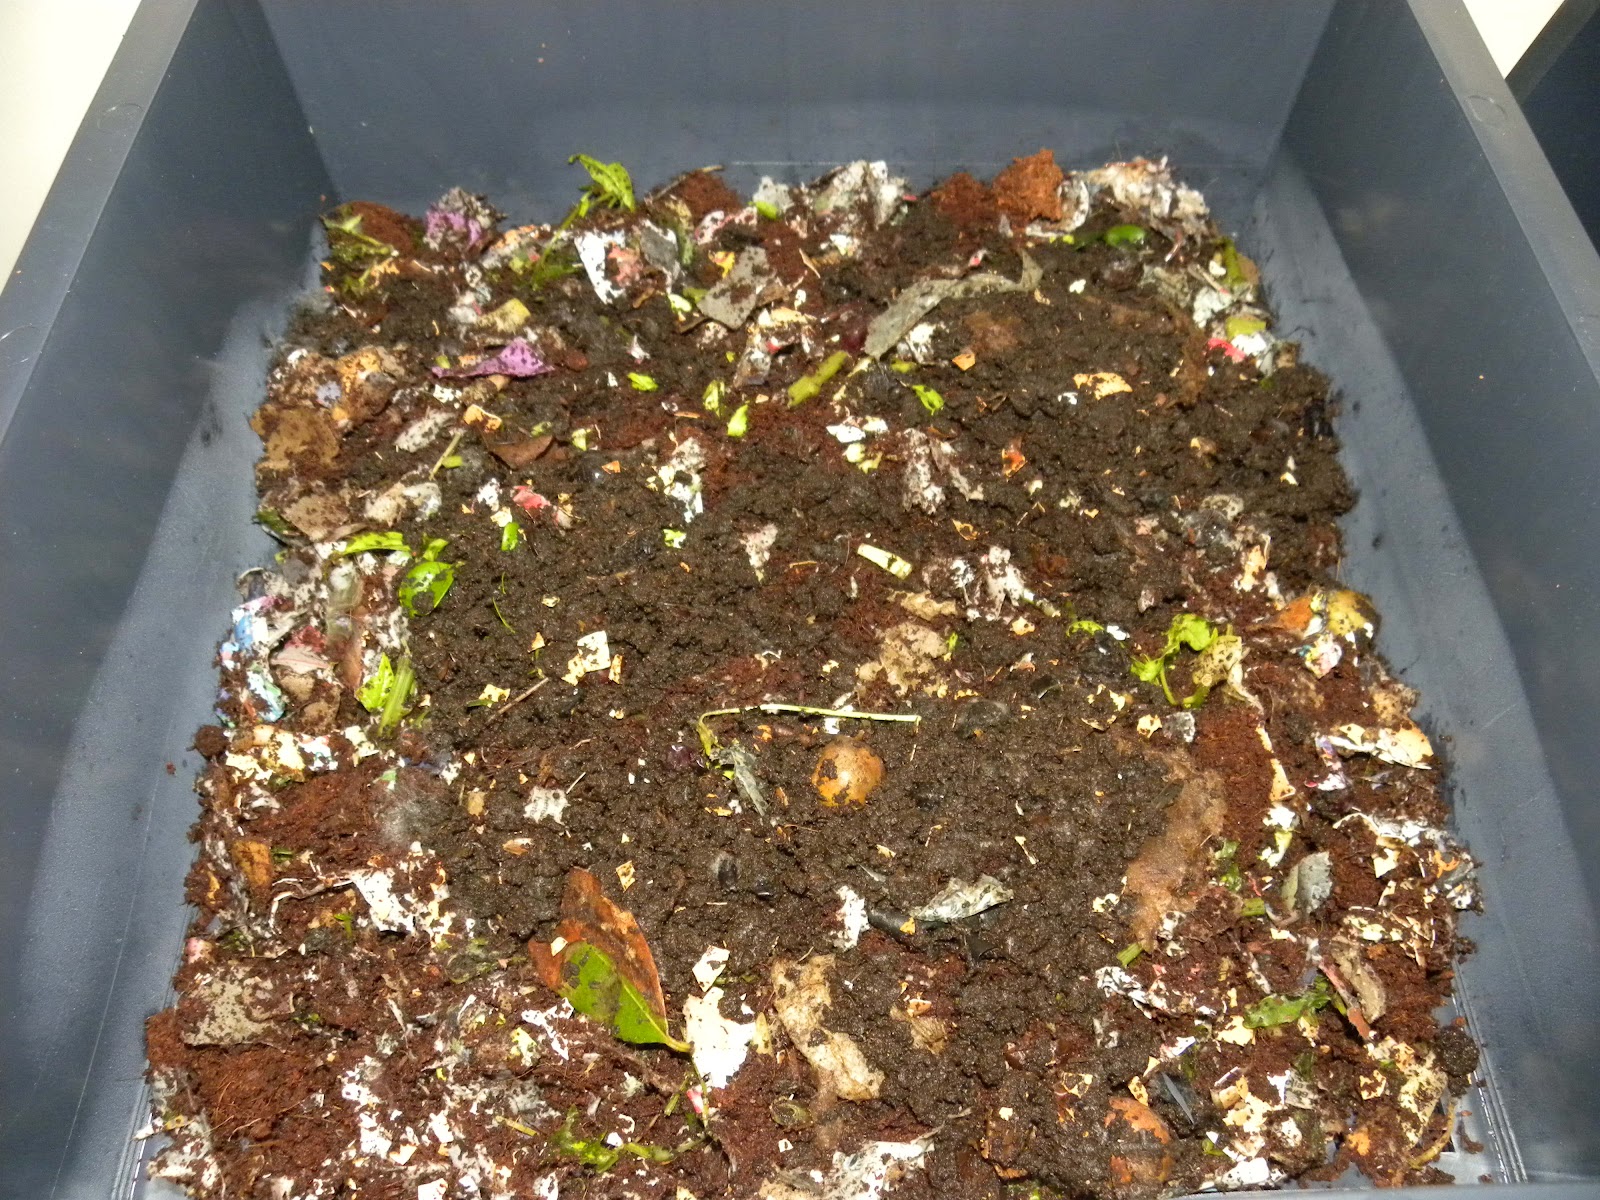
When you first add your organic material (50% food, 50% bedding), individual food items will be recognizable.  Over time, as the worms start to eat the material, the contents of your Wormcycler will become indistinguishable and black.  Once all the food is eaten and the worms migrate upwards to another tray, you can harvest your compost.  In these pictures, you can see how my food scraps broke down in just one month.  

Day 1 of my Wormcycler.  I added bits of food, old leaves from houseplants, shredded newspaper and coffee grounds.  
Black gold, 4 weeks old.  Most of what you see here has been produced by red wiggler worms.  The large uncomposted items are mostly pieces of eggshells.  Next time I will make sure that I dry and grind up my eggshells before adding them – this will ensure their proper breakdown.    

Wait, Tate said that this was a 'partnership'.  What do the worms get out of it?
In addition to their world-class fame and popularity, red wiggler worms used in vermiculture are provided with an ideal living environment.  They are well fed, well cared for and safe.  It is in our best human interest to rear large populations of red wiggler worms and keep them as a tool in our waste reduction/ waste recycling.  By producing less waste we can literally Live Lighter on the Land.  


Thursday, June 28, 2012

Post #18 What do you see when you look at the forest?

Over their working lives, each naturalist adopts and hones a unique way of understanding a landscape.  I've met naturalists that are instinctively aware of a landscape's surface and ground water: where its flowing from, where its flowing to, the sediments its carrying and where it is likely to deposit them.  To these naturalists, ancient landforms made by water (like deltas, kames or outwash plains) are the building blocks of the landscape; the initial eye-grabbers upon which all other landscape features fit into.  

Other naturalists think in terms of edible and medicinal plants.  When they walk through the forest they first see the roots, buds, leaves, and inner bark of these useful plants which, to them, are the landscape's building blocks, upon which all other ecological information relates to. 

I am unlike these naturalist; I don't automatically see underground water and I can't instinctively assess the medicinal value of a hillside.  I do, however, have my own way of understanding a landscape instinctively repeats as I go from region to region, place to place.  My way was not taught to me or deliberately developed; it just sort of came about.  Here's my way:  I consider how a place's 3-dimensional space is shaped and filled.  An ecologist would call this an ecosystem's 'structure'.  I instinctively wonder, "Is the forest dense or is it spacious?", "Are there holes is the forest's canopy?",  "What is the topography like?", "Are there lots of plants growing on the forest floor that make it difficult to navigate and maneuver through?"  As I ask myself these questions and process their answers, I construct a 3-D mental image in my head to help keep track of all the information.

A place's 'structure' is how its contents are spatially arranged.  An example of an uncommon forest structure, the Ossipee Pine Barrens of New Hampsire.  Here, there is a dense mat of lowbush blueberry on the ground and a stand of even age pitch pine trees.  

Why do I focus on a place's structure?  Why is a place's structure tell me me?  A place's structure tells me: 
  • what animals might live there
  • what plants might live there
  • how wind might move through it 
  • how sunlight intercepts it
  • where water might be found (which goes on to tell me lots of other things...)
  • about past land use
  • about past disturbances, etc.
Yes, all of these little details are foretold to me by a place's structure– how it is laid out, filled up and arranged.  Instinctively focusing on structure is my way of initially understanding a place.  You can call it my 'framework', and you can think of it as my brain's auto-pilot or mental scaffolding.  It's the way that I naturally experience my world.

Although it is my framework (and therefor I am a bit biased toward it) I must admit that both the naturalist who thinks of water and the naturalist who thinks of edible plants use their frameworks to deeply understand their natural environment as well.  Really, there is nothing special about my framework, except that it is mine.  As long as a framework works, it's as good as the next.  The best naturalists slide easily from framework to framework as they construct a comprehensive understanding of a place.   

So now I ask YOU a question.  How do YOU make sense of your surroundings?  What is your framework?  What do you see first?  What makes the most sense to you?  What are the building blocks of your backyard?  How do you arrange the pieces of your landscape?  How do you arrange your thoughts?  How do you arrange your thoughts about your landscape?  Is your framework built around sound, light, angles, bugs, birds, dirt, hills, topography, stone walls, air?  Surely, there is no right or wrong way to understand a landscape–there are only different ways.

The way you think about your environment is kind of like mental scaffolding.  Mental scaffolding holds and secures your concepts, assumptions, unknowns, fears and past experiences into an understanding.  

What if I don't consider myself a naturalist?  Do I still use a framework to understand nature? 
Of course you do.  Everyone uses a framework to understand nature.  The gardener, the painter, the casual hiker, the admirer of sunsets and the dog walker all use a framework to understand their natural environment.  Frameworks are a natural part of thinking.

Why is it important to identify your framework?
Most of my readers are interested in being stewards of their backyards, watersheds and towns.  The first step toward stewardship is knowing your natural environment.  What organisms do you share your backyard with?  What are the animals that have to cross the street in order to breed?  Which plants are affected most by the white tail deer?  Tuning into your surroundings is key.  As you tune in, your framework is dictating which pieces of your natural environment you understand and how you understand them.  By identifying your framework (in other words, understanding how you understand nature) your study of nature will be expanded, deepened, illuminated, enlightened and simply, made better.  Your framework is working to shape your world 24/7 weather you acknowledge it or not, so you might as well identify it and use it to your advantage.


What now? 
Go step outside and, as your thoughts start to process the natural world, pay attention to them.  Write these thoughts down and organize them into a concept map.  Talk about your thoughts with different people.  Continue to pay attention to your thoughts, your framework will reveal itself.


Monday, June 25, 2012

Post #17 The sit spot

My last post was a list of observations I made from my back patio while drinking my morning coffee.   It illustrated that wild nature is found everywhere–even in our backyards–and it is our job as responsible stewards to observe and understand it.  Today's post is about a simple technique that will help you observe and understand your wild backyards a little better.  The technique is call a 'sit spot'.  A sit spot is simply a convenient place that you return to frequently to sit.  Your sit spot can be as simple as your porch, patio or garden bench; you don't need to seek out an adventurous or otherwise impressive sit spot like a mountaintop or deep ravine.  Once at your sit spot, you are only to observe.  Anything and everything is fair game:  calling squirrels, chirping birds, hiding moths, blowing wind, dripping water, tunneling ants, falling acorns.  There is no goal, per se, but the idea is that by sitting in a place again and again the sitter slowly gains insight into nature.

Insight from sitting?  Is Tate crazy?  Well, let's take for example the American robin, one bird that almost everyone knows.  The American robins can be found just about everywhere you look: farms, small woodlots, cities, suburbs, college campuses.  They are present in our various stages of human development– they are the first birds identifiable by children and the last birds forgotten by aging adults.  I even found them on the Arctic tundra of Alaska!  Yet considering their commonness, can you answer the following questions about the American robin:
  • What do robins sound like?    
  • How deep are their nests?
  • How can you tell a male robin is courting a female robin?
  • How do robins clean their nest?
  • What noise does a robin make when it spots a cooper's hawk in the forest?
  • What do robins eat in the winter?
  • What do robins eat in the summer?
  • What is typical foraging behavior for a robin?
  • From which part of a tree can a robin be expected to sing from? 
The ubiquitous American robin.  So common, yet so mysterious.   

When we start to think about the details of the robin's life, we realize that we know almost nothing.   
When we start to realize that the robin has its own life–outside of our briefly identifying it–we can begin to understand and relate to it.  I often use the following analogy:
Think of a good friend.  Picture their face and recall their name.  Think of some notable experiences you have shared with them.  Think of how deep your relationship is.  Love.  Respect.  Openness.  Understanding.  Now think of all that would be lost if your relationship was instantly reduced to only knowing their name and being able to identity them in a crowd.  No more passion or family, history or camaraderie.  Just 'Bob, the guy with a beer gut, glasses and a shaved head'.  Wouldn't that be a shame?  Believe it or not, the same goes for your relationship with the robin.  It can be as deep or as superficial as you like.

Now back to your sit spot.  By visiting your sit spot over and over again, you will begin to see patterns, cycles and changes in nature.  The place around your sit spot will take on new meaning and put the rest of your life into a larger context.  You can expect to feel a connectedness and familiarity with your sit spot.  You will start to see the lives of the trees, bugs, birds, and rocks of your backyard.

You may have some questions.

How often should I visit my sit spot?
As often as possible.  Every day is great.  Once a week is better than nothing.  Less than once a week might make it difficult to build momentum.

Where should my sit spot be?
Very close to your house.  Backyard, side yard, front yard, porch, your kid's tree house– it doesn't matter as long as you are comfortable and outside.  Ideally, your
 sit spot should be very convenient– this way you are more likely to visit.  
A yellow Adirondack chair on a back patio.  This could be your sit spot. 
How long should I sit at my sit spot?
15 minutes per sit would be great.  You would be amazed at what you can experience in 15 minutes.  Imagine what you can experience in 30 or 40 minutes at your sit spot.  Some days will be longer than others and that's ok.

What should I do at my sit spot?
Just observe.  No observation is too small or unimportant.  For example, the number of times the robin called before flying to the ground, the color pattern on a fly's wing or how a tree bends in the wind– all these things have significance.  Here is what you do:
  • Allow your body to relax.  As you observe things, catalog the experience.  Write things down or sketch pictures in a special notebook (don't worry, if you don't consider yourself an artist no one else will see it).  If you are the diligent note taker, after just a few weeks of periodic sitting you will have a rich set of notes, pictures, diagrams and maps– keep these, they are priceless for understanding what's around you.
  • Catalogue what's around you.  Flowers, trees, bugs, rocks, water, wind–they are all important.  Don't worry if you don't know the name of a plant or animal.  Give them your own names. Instead of naming it 'highbush blueberry' you can call it 'canoe-leaved berry bush'.  An organism's name is not currently important, their lives are important.  Their names will come with time.  Keep records as organisms come and go through time (for instance, how winter birds differ from summer birds).          
  • Make a 'sound map' (see below).  A sound map is an illustrated 'map' of the sounds that you are hearing in relation to you.  Don't worry about precision or scale, the purpose of the map is just to organize what you are hearing.       


A sound map made by a child.  A sound map like this helps you organize what you are hearing and give it a spatial context.  This is a very simple sound map.  Yours may have many more sounds on it.    

Can I tell anyone about my sit spot?
Yes, talking about the experiences at your sit spot will help you process them.            

Here is an interesting video where nature mentor Jon Young talks about the importance of keeping a sit spot.  Although his purposes are a little more sophisticated and advanced than ours, he is tapping into the fundamental power and usefulness of sitting.  This is a cute video about keeping a sit spot.

What does sitting have to do with our Living Lighter on the Land campaign?  Remember that through  Living Lighter on the Land we strive to rethink our place on the planet?  Sitting shows us what we never knew about nature.  More importantly, sitting teaches us what we didn't know was even possible to know about nature.  With these new tools, we can start to rethink our place on the planet.